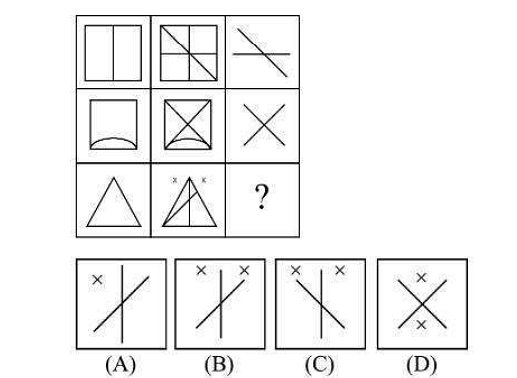
Find out which of the answer figures (A), (2), (3) and (4) completed the figure matrix?
Show Hint
\textbf{Visual Reasoning - Matrix Patterns.} In matrix-based visual reasoning problems, look for patterns that occur both across the rows and down the columns. These patterns can involve changes in shape, size, orientation, position of elements, or a combination of these.
The figure matrix shows a pattern that evolves both horizontally (across rows) and vertically (down columns). Let's analyze these patterns.
Horizontal Pattern (Rows): Row 1: The shape remains a hexagon, but the position of 'A' and 'B' swaps in the last cell, and the dividing line rotates.
Row 2: The shape remains a hexagon, and the position of 'A' and 'B' swaps in the last cell, with a rotation of the dividing line.
Row 3: The shape changes from a hexagon to a trapezoid. Following the pattern of the first two rows, we expect the position of 'A' and 'B' to swap in the last cell, and the dividing line to rotate.
Vertical Pattern (Columns): Column 1: The shape changes from a hexagon to a trapezoid, and 'A' moves from the top to the bottom.
Column 2: The shape changes from a hexagon to a trapezoid, and 'A' moves from the top to the bottom.
Column 3: Following this pattern, the shape in the missing cell should be a trapezoid, and 'A' should be at the bottom.
Considering the third row, the first two cells have a trapezoid shape with 'A' at the top and 'B' at the bottom. Following the pattern of swapping 'A' and 'B' and rotating the dividing line observed in the first two rows, the missing cell should also be a trapezoid with 'A' at the bottom and 'B' at the top, and the dividing line rotated.
Looking at the options:
Option 1: 'A' is at the top, which doesn't follow the vertical pattern of 'A' moving to the bottom in the third column.
Option 2: 'A' is at the top, which doesn't follow the vertical pattern.
Option 3: 'A' is at the bottom and 'B' is at the top in a trapezoid shape, and the dividing line is rotated compared to the first two cells of the third row. This fits both the horizontal and vertical patterns.
Option 4: The shape is a hexagon, which doesn't follow the pattern of the third row where the shape changes to a trapezoid.
Therefore, Option 3 correctly completes the figure matrix.